~~~~~~~~~~~~~~~~~~~~~~~~~~~~~~~~~~
Lane Darnton
(NOTE: Expand your browser window to full screen,
or at least 800 pixels wide.)
While it is no mark of intelligence, there are those among us
for whom lowering Checker front ends the cheap old fashioned way —
by cutting or changing springs, not subframing — and then driving
them around every day as if they were normal, seems like a good idea. I
say this because of all American cars, the Checker seems designed to thwart
this approach. That is because it has this big dumb U-shaped pipe as a
suspension crossmember that hangs down below the oil pan, ready to kiss
the pavement if you aren't careful. If that weren’t enough, right behind
it is the steering center link, protected only by the crossmember, so
you can't trim the crossmember. As long as you keep these cars at their
original dorky elevation, life is easy. Lower them, and life becomes a game
of spring rates and fractions of an inch. In this article I don't plan to
justify this game, only explain how it is played.If you’re still reading, it must mean you share this morbid interest at some level, so let’s get to it. The forward crossmember of a stock Checker, on stock springs (about 330 lbs/inch) and stock tires (215/75x15), sits more than 10 inches off the ground. Which is why it never runs into curbs or parking lot bumpers. Mounted on this crossmember is the forward bushing of each lower A-arm. The main crossmember, which mounts the rear of the A-arm, is only 6.25 inches above the pavement. Trust me, this a lot lower than you think while sitting in the driver’s seat. It’s the lowest thing on the car even before you hit the brakes or nail a bump.
In order to get the front end lowered enough to really look cool, you have to get this clearance down to about 2.5 inches. Here’s the problem: if you keep the stock tires so you’ll get that “hooded” look where the wheel opening visually clips the top of the tire, you have to trim the springs down so you bottom out the suspension on the rubber stops, AND trim the rubber stops down to about 1.25 inches in height. This leaves you with zero suspension travel — not a bad thing when your crossmember is 2.5” off the pavement — but you won’t enjoy the ride very much.
The only way to get any suspension travel back is to leave the springs a little taller, and then lower the car by putting on smaller tires — say, 215/60x15. But now, even though the car is low, you’ve lost the “hooded” look. Thus the Checker lowering dilemma: you can’t bury the tires up inside the wheel well unless you trim that crossmember, but if you do that, you’ll tear off your center link the first time it hits the ground. Which it will. So if you're starting to think subframing makes more sense the further you read, my advice is quit reading now.
You’re still here. OK. What we’ve learned so far is that you’re going to have to strike a compromise within fairly limited bounds. You have to decide how little clearance you’re willing to tolerate, which will depend on what kind of roads you’re planning to drive on. Let’s start with a picture.
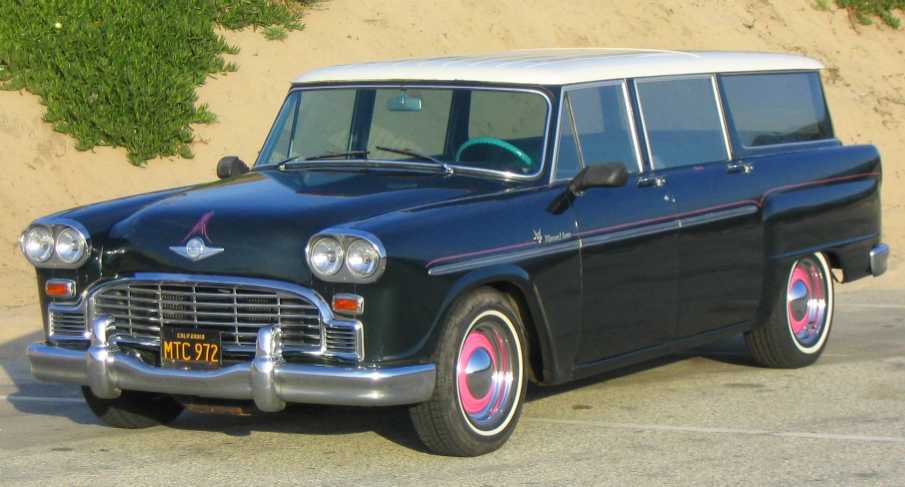
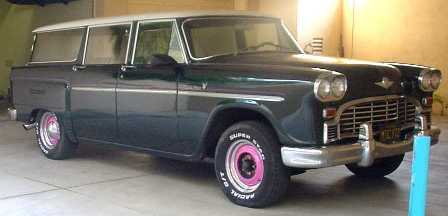
This is what a Checker looks like when you leave the rear end stock and lower the front end 1.75 inches. The crossmember ground clearance on this car (my car), at rest on flat pavement, is 4.5 inches. The front tires are 215/75x15 (stock) and the rears are 225/70x15 (wider but same height as stock).
Let me show you the crossmember under this car.
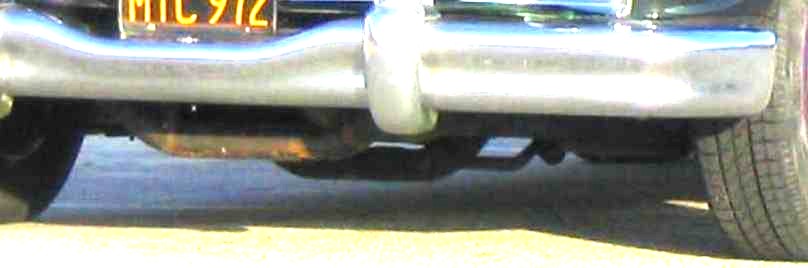
From left to right in the photo above, that’s the forward crossmember (in sunlight), the main crossmember, and the center link. Note that the center link is almost as low as the main crossmember. It is only half an inch higher. Why not higher? Because when you steer the car left or right, the Pittman and idler arms describe a circle and the center link rises accordingly. At full lock it looks like this underneath:
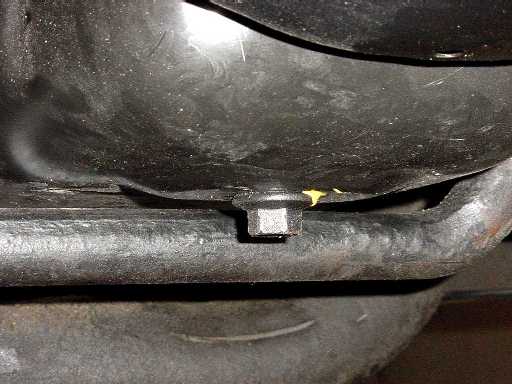
That’s the oil drain plug you’re seeing. The center link clears the oil pan by a only few millimeters at full lock. So you can’t raise the center link.
You can drive this car on just about any paved road in the country, and I do. Crowned roads, bumps, dips, whoop-de-dos, and potholes can be problematic due to suspension dive, either from the bumps themselves or braking for them (or in them), but on the whole it works pretty well. One learns to accommodate.
So much for conservatism. Now let’s look at Gary & Carol Fercho’s Aerobus:

This ‘bus has 215/60x15 tires in front and 2.5 inches under the main crossmember. It has been lowered 3.75 inches. If Gary drives anywhere except the freeway or flat well-maintained city streets, his crossmember scrapes pavement. He only has suspension travel at all because his front tires are shorter than stock. He owns a diesel truck big-rig repair shop in Stockton, CA (a FLAT place), and has all kinds of tools and talent available, so he probably figures he’ll just let the crossmember scrape through, then MIG-weld a steel plate across the bottom and keep on driving. I have to say, I can see some wisdom in that.
If you’re set on putting the crossmember near the ground like Gary, you’ll want to increase the spring rate so you’re not hitting the ground ALL the time. Cutting your springs down does increase the spring rate while lowering your car, but not enough. Ideally, the spring rate should increase AT LEAST in inverse proportion to the remaining suspension travel – in other words, if suspension travel is halved, the spring rate should AT LEAST double, so it takes the same force as before to bring the car to the bottom of its suspension travel: half the travel, same force, so twice the spring rate. Let’s see if anything close to this actually happens when you cut the spring.
The spring lever arm ratio on a Checker is exactly 2.0, that is to say, the spring is located exactly halfway between the lower A-arm pivot and the lower ball joint. These distances are 9.0 inches and 18.0 inches respectively. Very simple. Those Checker engineers weren’t trying to overtax their brains. What this means for you is that every inch you cut off the COMPRESSED spring lowers your car two inches. This is math you can do in your head.
The stock spring is 15.25 inches tall unloaded, 10.5 inches tall loaded, and has a spring constant of 330 pounds per inch (lbs/in). If you lower the car so the crossmember is 4.5 inches off the pavement, that’s a reduction from stock of 1.75 inches, which means you'd need to cut off 1.75”/2 = 0.875” from the COMPRESSED spring height of 10.5 inches, so the new compressed spring height would be 10.5” – 0.875” = 9.625 inches. (In practice this is done by measuring the center-to-center distance between coils and figuring out how many coils — or what fraction of a coil — needs to be cut off.) The new spring rate is increased in inverse proportion: it is now 330 x (10.5/9.625) = 360 lbs/in, an increase of 1.091x or 9.1%. At the same time, recalling that the suspension bottoms out on the rubber stops when the crossmember is 2.5 inches off the ground, you have 2.0 inches of suspension travel remaining where you used to have 3.75 inches, or 2/3rds as much. The inverse of 2/3 is 3/2 or 1.5, which is how much you would like the spring rate to have increased so the bottom-out force stays the same. Instead, the bottom-out force is now 1.091/1.5 = 0.73x what it used to be, or 27% less.
Wait. This is bad. We wanted the SAME force OR MORE to bottom out. Instead we have LESS.
It gets worse. If you drop the car until the crossmember is 2.5 inches off the ground, the remaining suspension travel is ZERO, so the inverse rule of thumb says the spring rate needs to be . . . INFINITE. Well OK, since you are now resting on the stops, it IS infinite, more or less, but not because of the springs. You might as well take them out and throw them away at this point.
The upshot is, cutting your springs doesn’t work very well. It will make your car lower, yes, but it won’t make you happy. The old low-rider alternative of heating the lower coils of the springs until they collapse works a little better — because, since the collapsed coils are still in place as spacers, you have to heat more coils for a given ride height than you would have had to cut off, so the resulting spring rate is higher — but it still isn’t enough, and you’ll worry constantly about what will happen when that segment of detempered steel where the torch stopped shatters at freeway speed. Nothing good, that much is certain.
So now what? This is where the game of fractions of an inch comes in, and you start asking yourself “How often/hard am I willing to hit the ground in exchange for that low look?” Hard core “kustomizers” don’t even ask this question, they just slam it right down and put skid plates wherever they need to. (Believe it or not, this process actually is called “slamming”, as in “chopped, channeled, and slammed”.) The rest of us, who actually drive our cars, realize that an inch of suspension travel is worth something, and can be gained by cutting about 3/4" off the rubber suspension stops and putting in new springs with double or triple the spring rate. So off we go to the Moog Springs catalog, opening up a blank Excel spreadsheet on the way. We’re gonna need it.
I’ll cite my own case as an example. I wanted a final ride height of 4.5 inches off the ground (at least to start). The ride height I had (because I had retrofitted disk brakes to my 1965 car — oh, did I fail to mention that just changing to disk brake spindles lowers your pre-1968 Checker 2.25 inches? With zero change in spring rate??) was 3.5 inches with stock springs — which, as I said, had a spring constant of 330 lbs/in. They also had an inside diameter (ID) of 3.885”, an outside diameter (OD) of 5.25”, and a spring wire diameter of 0.682”. I knew I had space in the frame socket for a spring OD up to at least 5.5”, but I didn’t want the ID to be less than stock because I wanted room in there for the biggest shocks I can find. This meant I could go up to a wire diameter of 0.808” or so. And since the spring rate is proportional to the 4th power of the wire diameter, I could possibly get a spring rate up to (0.808/0.692)^4 = 1.96x higher. Almost double. And since I would be cutting the new spring as well, to get the ride height I wanted, it could get even higher.
In the catalog, I found Moog P/N 5426, OD = 5.47”, ID = 3.99”, spring wire diameter 0.740", unloaded height = 16.84” (definitely have to cut THAT), and uncut spring rate = 477 lbs/in, a 1.45x increase. A few calculations showed that in order to get a final ride height of 4.5” I’d need to cut them to an unloaded height of 12.97”, where they’d have a spring constant of 635 lbs/in, an increase over stock of 1.96x. (I purposely kept this value below 2.0 for the first iteration, since a pair of springs only costs $125.) Note, however, that the new spring would only be compressed 2.47 inches installed, whereas the stock springs had been compressed 4.75 inches. If the front end of my car ever comes off the ground, these springs will be loose in the socket. Might have to alter the upper suspension stops to keep this from happening.
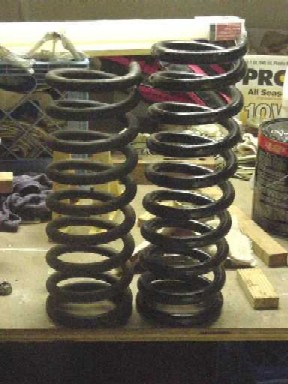
Since I didn’t entirely trust my calculations (for reasons I won’t go into), plus the fact that the delivered springs were 4/10ths of an inch taller than the catalog said, I cut off somewhat less than I calculated in order to leave margin for error. This was the result:
Whoops! Way too high. Looks like a stock Checker! But now the 2-to-1 ratio told me exactly how much farther I needed to go.
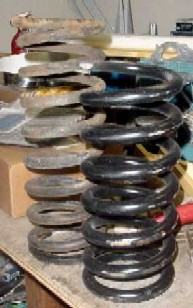
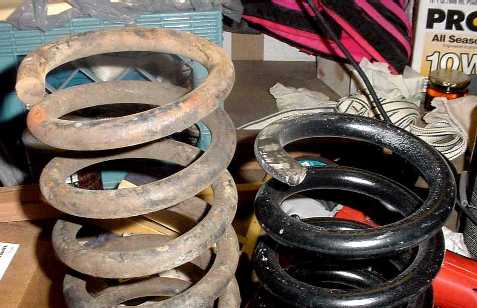
My next cut, plus grinding the spring end to flatten and taper it where it sits on the A-arm, brought the total unloaded spring height to 13.0 inches, just what my calculations said. Here it is next to the old spring, before and after cutting. The new spring is on the right.
BEFORE CUTTING
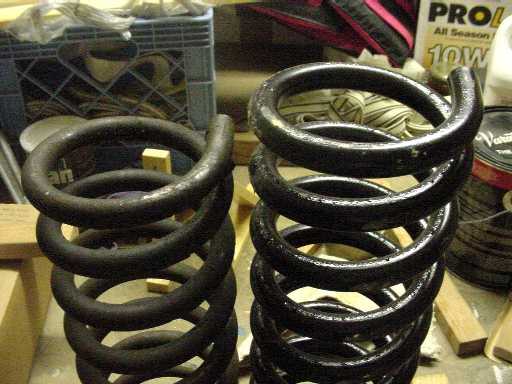
AFTER CUTTING and TAPERING
The first picture in this article shows the final product. The car is now quite a bit stiffer, and scrapes the road far less often, even though the ride height is 1.75” lower than stock.
In fact, I'm thinking that if I shave some more rubber off the stops, I could drop it another half inch, maybe even an inch if I got even stiffer springs . . .